Adding Products
By default, the eCommerce add-on creates some example products for you. These are all different kinds of ducks. You will probably want to sell something different on your website. So you will have to add some different products.
The first page you visit when you enter the eCommerce section of the Dashboard is always the "Products" page. From here you can get a general overview of what you are selling. it is also the interface you use to modify and create new products. The "Add Product" button is at the bottom of the page.
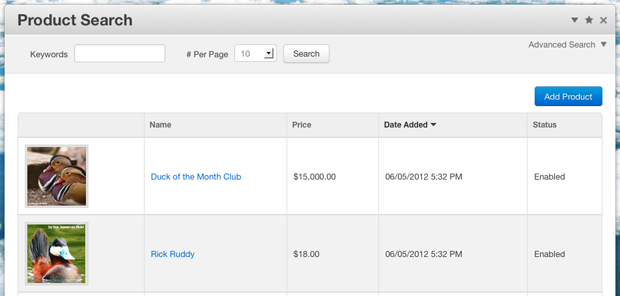
The "Add Product" button will bring you to the "Create Product" dialogue. The "Edit Product" dialog lets you change all the same things as when you create a product, so all this can be changed later. You edit a product by clicking its name in the search page, then choosing "properties"
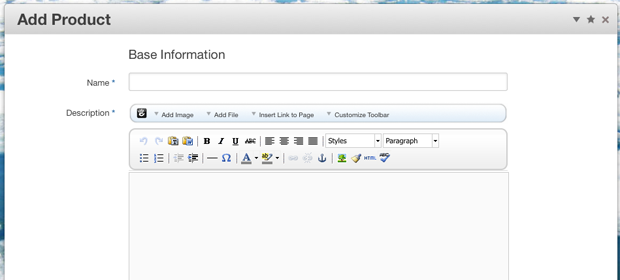
The first two fields you get let you give your product a name and description. The Description area is the familiar content block editor you have seen elsewhere in concrete5. Your description doesn't need to be a full article-length text. Products can actually be included on normal concrete5 pages with extended descriptions, gallery blocks, and so on.
This is also not the place to add pictures of your product. Product pictures are their own animal and we'll add those later.
The rest of this page defines much of the product's data. So in a sense, this where your "logical" description of the product begins.
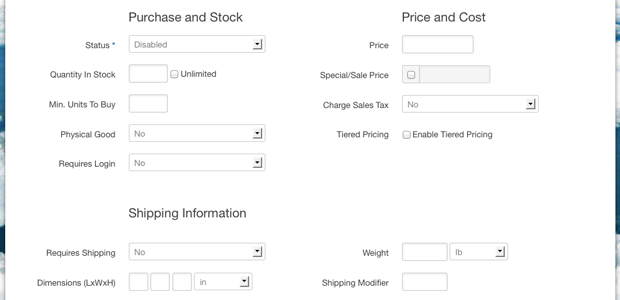
This section of the new product defines the various properties a product has.
- Status: enabled / disabled. When a product is "disabled," it will not be visible or available for purchase to potential customers.
- Quantity In Stock: how many you have.
- Min. Units To Buy: If you want customers to have to buy at least a dozen eggs, for example, this is how you define the limit.
- Physical Good: When this is "yes," shipping will be enabled. Also, you can then set weight and dimensions so your customers know just how big that breadbox they're buying is.
- Requires Login: When set to "yes," customers are required to be logged in to your site before purchasing.
- Price: An obvious one. Make sure you set it higher than zero.
- Special / Sale Price: When this is set, your customers will see that the original price has been discounted. Savings are imminent!
- Charge Sales Tax: Some goods can't be taxed, this is how to comply with that.
- Enable Tiered Pricing: Use this to enable volume discounts or "I only want one" premiums.
- Requires Shipping / Shipping Modifier: If this item is something like "a feather" or "dreams," you might not want to charge shipping at all. If it is something like "a brick" or "scorpions," you can add a surcharge in the modifier.
Product Attributes
The next section is to set "Product Attributes" for a new product. These are sort of generic descriptors that you can create to help differentiate and categorize your products. Disitinctions you create here aid customers in searching for and selecting products. The topic has its own page.
Product Page
As metioned in the paragraph about product description, you can create an entire page devoted to a specific product. You might want to explain at length the quality of materials, allow your customers to have a conversation about the product, etc. Anything you can do in concrete5 can happen on that product's page, too.
Of course, if you just want a picture of the product and its description, that is already generated for you by default.
Buying Group Membership
Here you will see a list of all the groups on your site. When you check one of these groups, whoever buys this product will be placed into that group. For instance, if you were selling something very complicated, you could have customers added into the "product support" group which would then grant them access to members only documentation and support forums.
Note: enabling this option will require customers attempting to purchase the item to login or register prior to checkout.
Product Sets
Sets are useful for categorizing your products. They have their own page in this documentation, but basically they help you show only a specific type of product, or to group products that aren't necessarily related, but make sense together. Like a certain set of pants, shoes and shirt.
Editing
After a product is created, you can edit a product by clicking on its name from the product search, which is the default page when you're in eCommerce on the dashboard.
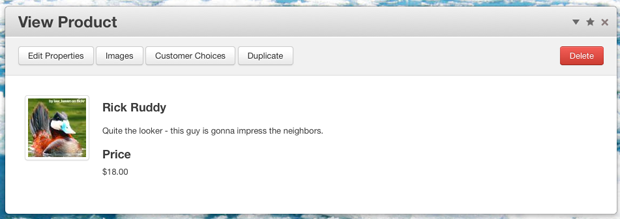
Clicking "Properties" will bring you back to the same page you saw when initially adding the product.
"Images" will let you add images.
"Customer Choices" are a special feature that lets customers choose different options and change prices.
"Duplicate" will make a copy, and "Delete" will remove the product.
Product Images
You can set some images with special properties for your product:
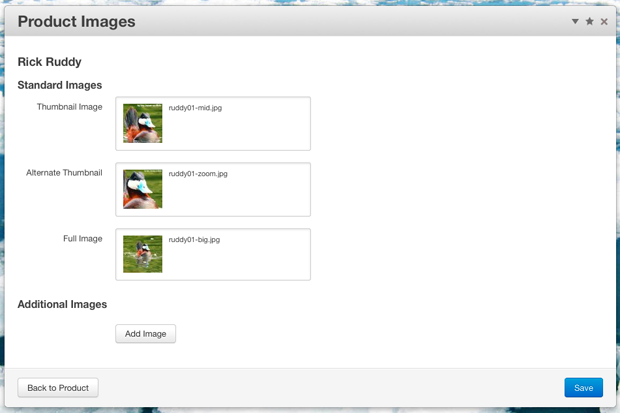
Each image has a specific purpose. When displaying a product in the product list block and single product block you can choose which you want customers to see depending on what they are doing. By default, the thumbnail image will show up, when the image gets a mouseover, the alternate thumbnail is displayed. If the Overlay (a small overlay that shows details about the product) is used, the full image shows up there.
If you specify additional images, a pop-up gallery of images is shown when a customer clicks on a picture.
If the lightbox or other interface elements aren't showing images, try making sure that your products all have additional images assigned to them in the Dashboard. This is the list of images that appears below detail image, thumbnail and alternate thumbnail.