Documentation
If you have added JavaScript that has broken your site, skip to the end.
(While reading this, you may want to havce a second window open to view the screenshots from the main jQuickie page)
Getting Started
Edit a page, add a block and select jQuickie. The edit interface will pop up with some sample script in it.
JavaScript is generally used to manipulate or insert content on a page. The example script appends content to a 'div' automatically inserted by jQuickie, which can always be accessed through the variable 'jquickie_div_selector'. So $(jquickie_div_selector).append() will append content to this 'div'.
If you click to the 'Set Options' tab, you will see that 'Provide an empty div element' has been checked.
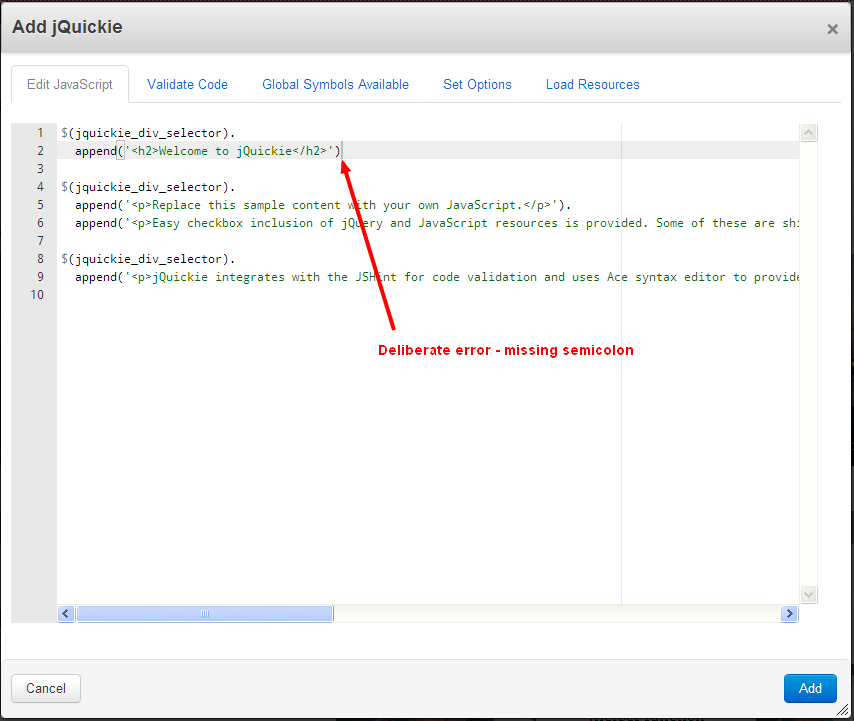
Just for fun, click back to the 'Edit JavaScript' tab and remove a semicolon or one of the quotes from a string in the sample code and click the 'Validate Code' tab. You will get a whole host of error messages telling you how this missing quote has murdered your script.
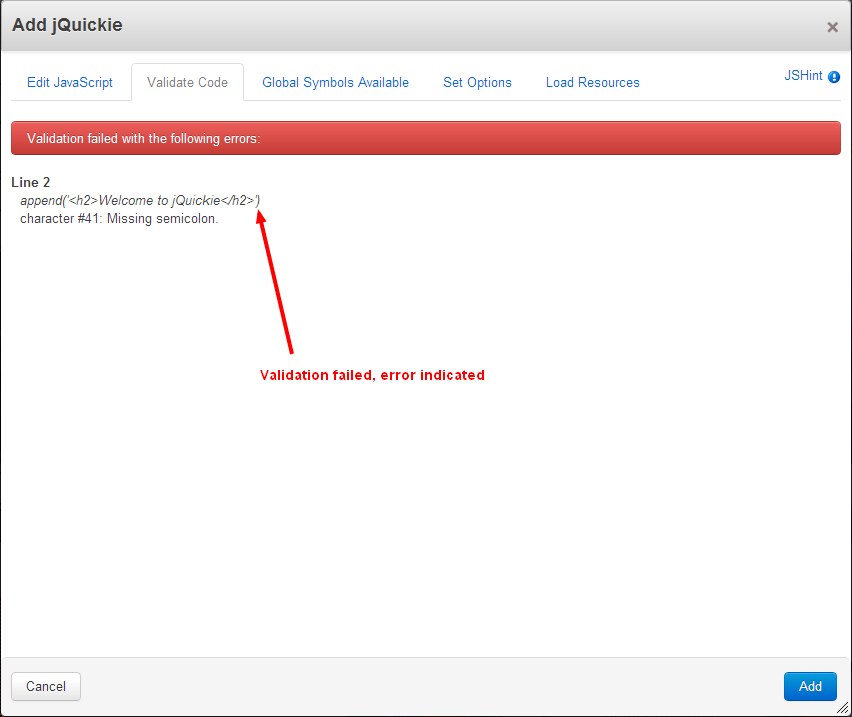 Now go back to the 'Edit JavaScript' tab and correct the sample code. Click the 'Validate Code' tab again and check the code is now valid.
Save the block, 'Publish' your edits and see the text that is written into the page by the script in the jQuickie block.
This was just writing some text, not a great use for the great power of JavaScript and jQuery, but it does show you that a script is running and that the basic stuff works.
Something more complicated
Lets do something more exotic. The real power of jQuickie is when you use quick snippets of script to modify and enhance content provided by other blocks on a page.
Edit the page again and add an image block. Select a picture and Add, then enter the Design for the block and give it the class 'pop-me'.
Now go back to your jQuickie block and edit it. You can either remove all the sample script already in the block, or add some new script to the end:
var src = $('div.pop-me img').attr('src');
$('div.pop-me img').wrap('a').parent('a').attr('href',src).text('Pop Me').fancybox();
The first line is telling jQuery to find the 'div' element with the class 'pop-me' and then find any 'img' element inside it and to note what the url for the image is.
The second line then wraps the image in an 'a', makes the 'href' of the 'a' the url of the image, replaces the image with the text 'Pop Me', then tells fancybox to do its stuff.
Check it validates again, then before saving go to the 'Load Rersources' tab. Leave jQuery ticked and also tick Fancybox. Save the jQuickie block and publish the edited page.
The page will load and you will get a flash of the picture before it is replaced with a link. Click the link and up pops your picture in a facybox. The only glitch is we have the flash of bare picture spoiling the overall effect.
Edit the page again, select the design of the image block and in the 'Additional Css' part enter
display:none;
When the page is viewed this will hide the block until we are ready to show it.
Now edit the jQuickie block again and add one small line to 'show()' the block once the image has been replaced with a link.
var src = $('div.pop-me img').attr('src');
$('div.pop-me img').wrap('a').parent('a').attr('href',src).text('Pop Me'). fancybox();
$('div.pop-me').show();
Validate and save, then publish the page. Now we just get the link showing when the page is rendered. Give it a click. Pretty cool for an off the shelf image block and three lines of script!
Taking it Further
Script experts will already have noted that little piece of jQuery could be written more efficiently.
For those familiar with html blocks, you could also do it the hard way and put the above code inside a jQuery ready handler and script tags and an edit mode test within a regular html block.
There are also marketplace blocks that do similar stuff already.
But all that is beside the point. What we have done is to create this effect in a few lines of code with very little effort. jQuickie has done most of boring part for us. We have also used a nifty validation tool to minimise our coding mistakes along the way. Finally, we included the library we wanted just by ticking a box.
Think more about the capabilities of jQuery selectors. Rather than creating and selecting one image block, we could have created a whole host of image blocks and it would not have taken much more jQuery to select them all and turn them into a slide show. While we are at it, we could have inserted some blocks of text into the show and experimented with other lightbox or slider designs simply by changing '.fancybox()' to whatever we wanted to use and ticking a different resource.
A detailed example of how to do this has been posted on the forum for the List Files From Set addon, using a custom template for List Files From Set to show a list of thumbnails, then turning that into a gallery with a jQuickie block immediately below the List FIles From Set block. See:
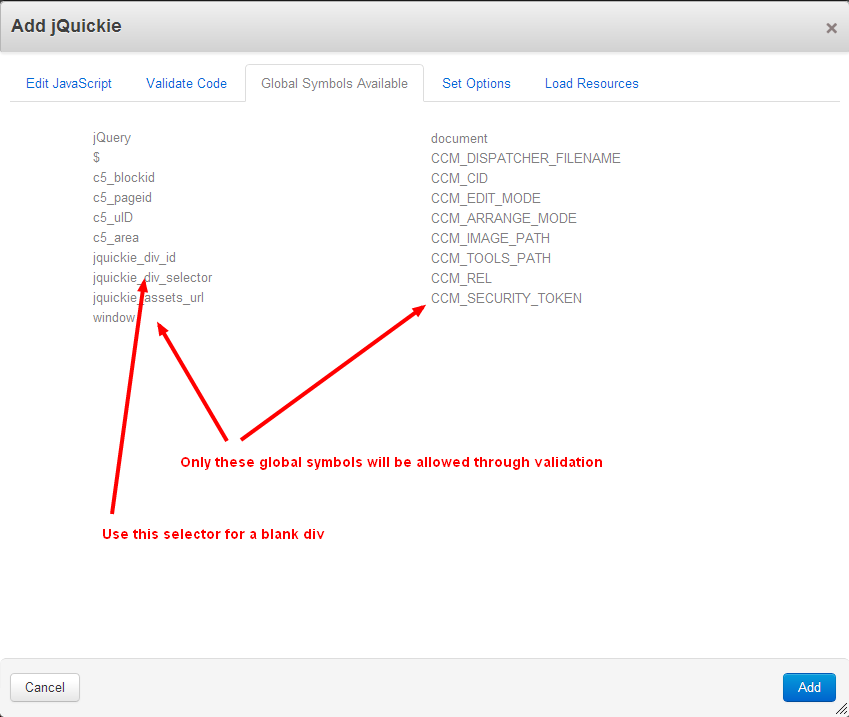
Global Symbols Available
We have not paid much attention to this tab yet. It doesn't actually do anything except tell us what global symbols the validator will let us use from outside our script. Note that the 'jquickie_div_selector' used by the first example script is amongst those listed.
This will always contain the #id slector for the empty div created by ticking the checkbox on the Set Options tab.
Set Options
Now have a look at the rest of the 'Set Options' tab. By default, jQuickie blocks are created with the safest set of options already enabled and a 'div' provided for the script to work with. We didn't use that 'div' for the fancybox example, so that checkbox could have been left un-ticked.
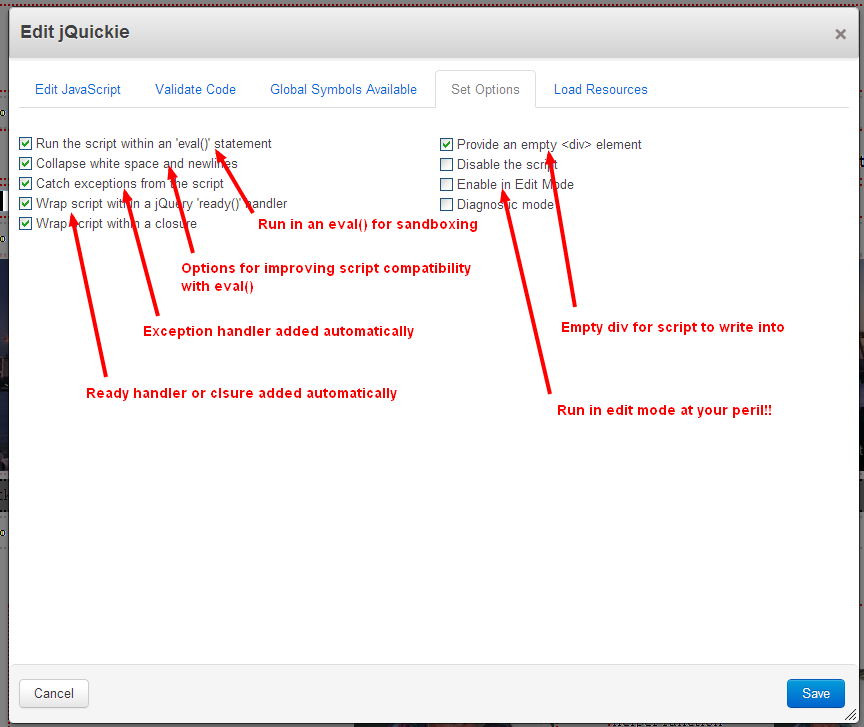 Running the script within an 'eval()' statement means that the rest of your page receives much better protection from any errors in the script. The disadvantage is that 'eval()' can give problems if there are multi-line strings and any comments in the script.
Hence the next option, to 'collapse white space'. This option only takes effect when 'eval()' is ticked. White space is either collapsed, or (if unselected) new lines are escaped, which is another technique for squeezing a script into an 'eval()' statement.
More complex scripts could confuse an 'eval()', so if you run into problems you may want to un-tick both of these. When you start running scripts big and complicated enough to need some comments, you definitely want to un-tick these!
Unless you want any script exceptions to propagate outside your code, 'catching exceptions' (and reporting them to the developer console) is probably a good idea.
Its also usually a good idea to use a 'jQuery ready handler' to make sure your script does not run until enough of your page is loaded for it to operate on.
Putting a script 'inside a closure' means that it can't be seen from outside the closure and can't pollute the global JavaScript namespace. It means you don't have to worry about any variables you declare having unintended consequences. If you need to connect with other scripts outside the closure, consider using using custom events. Or you could turn this off as well!
jQuickie scripts are loaded 'inline' or in the 'header' or 'footer'. One of these options must be checked.
We have already discussed the 'div' option, so next we come to the 'Disable' checkbox. With this checked, you can develop, save and work on scripts over several iterations without having to worry about anything incomplete executing and breaking your page. If you try to save a script that does not validate, you will be reminded about this option. Remember to un-tick it when you want a script to run.
Most of the time, we don't want scripts to run in Edit Mode, so by default that checkbox is not ticked.
Finally, the 'Diagnostics' option will output a whole load of stuff about your script onto the page. The best way to understand it is to just tick it and see what happens when the page is published.
Load Resources
You probably already have a pretty good idea about this tab. Here we have a whole shed full of script libraries with their associated css and graphics all prepared and ready for loading at the tick of a box. CSS assets are loaded in the page header. JavaScript assets are otionally loaded in the page header or footer.
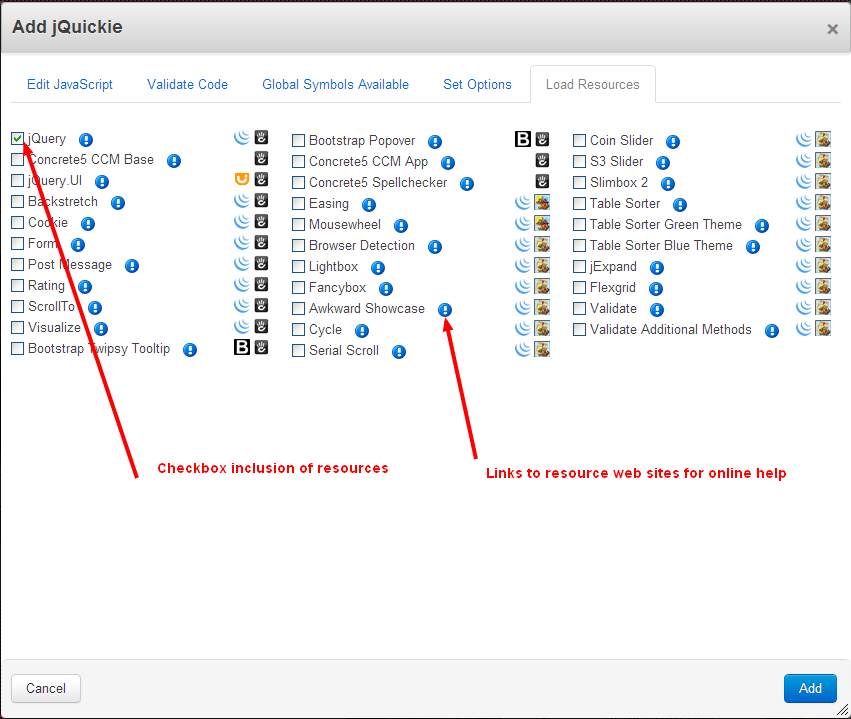 The sequence of some of these resources is important. Some libraries depend on others. You can find out more by clicking the information icon next to each resource. If you need to change the sequence, use the Manage jQuickie Assets page on the dashboard.
If the scripts you want are not already here, put in a request on the jQuickie forum or create a small package and upload it. The format of the jQuickie Resources1 package is simple to follow.
Dashboard
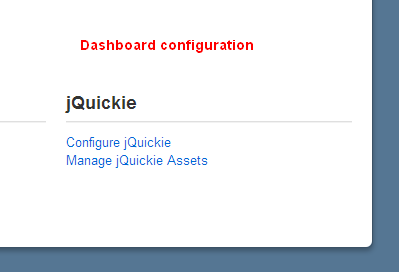 The jQuickie dashboard contains 3 pages and most of the time you can just leave these alone with their default values.
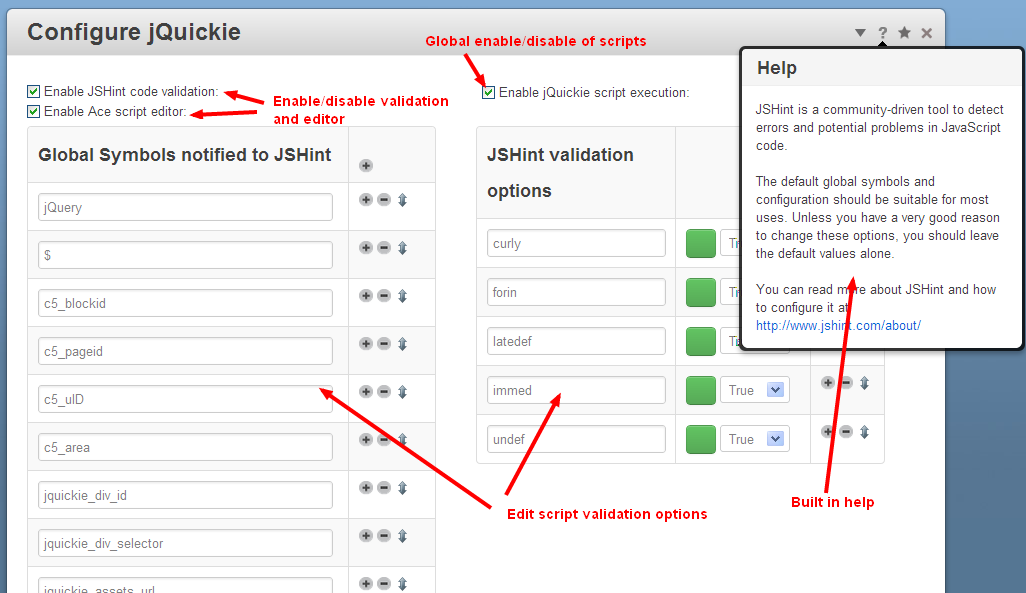
Configure jQuickie
At the top are three checkboxes.
If the syntax editor does not get on with your browser (most likely some versions of Internet Explorer), you can turn it off and just edit script in plain text areas.
If you want to live dangerously, you can also turn off validation,
Finally, and most importantly. You can turn off jQuickie script execution globally. If you write a script block that breaks a page or the entire front end of your site, you can come to the dashboard and un-tick this box while you sort out what went wrong.
Configure JSHint
This page is about configuring the JSHint validator for the environment you work with and the style of coding you prefer to use.
The left hand list is global symbols the validator will ignore, so if there is a global JavaScript symbol somewhere on any page that you need to use, but the validator complains about, you can list it here. There are also symbols provided by jQuickie for your convenience, like the uid of the current user, the block ID and area name.
The right hand panel is a list of validator rules and their status. If you want more or less restrictive validation for your scripts, thern read the JSHint documentation and adapt these rules to your requirements.
Manage jQuickie Assets
This page lists all the resources currently known to jQuickie. You can shuffle them up and down to modify the loading order or disable them completely if you just don't want to see them in the jQuickie block edit dialog.
When new packages of jQuickie resources are installed, you may want to 'Scan for Assets' if they do not add automatically to this list.
Development Process
If you browse the bundled script resources, you wil see that most of them require a particular DOM structure - the arrangement of html elements - before they will work. To use them, you need to:
- Build the right DOM structure
- Select it with jQuery
- Apply the resource effect to it with whatever options are needed
The difficult step is usually the first one, get the DOM structure wrong and the effect will go wrong or just not work, often with little feedback.
To get to the right DOM structure, you first need to assess what you already have using the Developer Console. You can then add elemnts in to that using any of the Concrete5 blocks you have available, using HTML blocks to enter raw structure, and using jQuery DOM manipulation methods to slice and dice, to finally come up with the DOM you need as the foundation for the resource effect.
Along the way, continue to use the Document Console to see what you have built and make sure it is building as you expected.
A good trick for testing jQuery selectors is to use them to add a border or background colour to the element, that way you get visual feedback of what you have (or have not) selected.
$('complex selector').css('background'.'red');
The 'css()' method is chainable, so you can insert it into the middle of any jQuery method chain to see various stages of it.
For doing effects with images, the main difficulty is knowing their URL within Concrete5. There are a couple of tricks for doing this:
- Include an image block or other block with an image on the page, but hide it, and exctract the src attribute (as we did in the example abovce).
- Use an image block or other block with an image to temporarily add an image to the page, get its URL using the Document Console, copy that into your script, then delete the temporary block you used. In this case, you may want to modify the URL to be CCM_REL+'rest_of_the_image_path.jpg'.
Coping with Serious Problems
The biggest problem with script development is when you publish a jQuickie block and the edit bar at the top of your page locks up in a blank grey and won't come out of it no matter what you do.
The two most likely reasons are:
- You have loaded an asset that was already loaded (the same jQuery addon downloaded twice, but from different files). Maybe you ticked a resource that clashed with one already provided and loaded by another block. There will likely be an error message in the Developer Console.
- Your script has broken badly enough to prevent further JavaScript execution. There will likely be an error message in the Developer Console.
You can usually get into the dashboard bypassing the front end of your site by typing yoursite.com/ index.php/dashboard/ into the browser address bar.
Once there, the first option is to get into the dashboard site map and move the offending page back one version.
Another option is to get into the Configure jQuickie dashboard page and disable jQuickie.
If you can't even get into the dashboard, you can disable jQuickie using phpMyAdmin to delete the item JQUICKIE_ENABLE from the Concrete5 config table.
With jQuickie disabled, you can now navigate to the offending page and revert its version or edit the jQuickie block to remove the problem that broke your site before going back to the dashboard and enabing jQuickie again.