Along with improving the installation process to better support the command line, 5.5 has made it much easier to determine the content that gets placed in a new concrete5 site. This content is typically called "sample content," but we're introducing a new terminology in 5.5: "Starting Points."
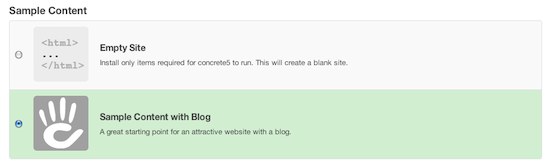
concrete5 5.5 comes with two starting points by default: "Empty Site" and "Sample Content with Blog." You must choose one when installing concrete5:
Before 5.5, these options were hard-coded, and used custom-built .sql files to install the right content. Generating these .sql files was error-prone and laborious, and we wanted to get away from it in 5.5. We did, in a big way, with the introduction of the StartingPointPackage class, and the Content Import Format
StartingPointPackage
Both "Empty Site" and "Sample Content With Blog" are instances of the StartingPointPackage class. As you might imagine, the StartingPointPackage class extends the Package class. This is the same class that marketplace developers use to distribute add-ons and themes. The Package format is heavily documented
Starting Point packages have a few special properties that regular packages don't have.
Location
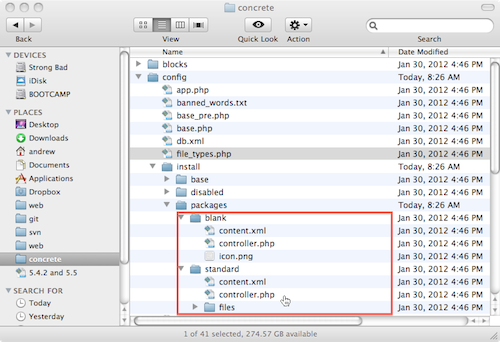
Starting Points are placed in concrete/config/install/packages/ or config/install/packages/ in your web root.
File Import
By default, any files placed in the files/ folder within your Starting Point package directory will be imported into concrete5 when that Starting Point is selected and installed.
Content Import
By default, any file named content.xml will be imported into your concrete5 site. This file will need to be in the Content Import Format, which you can read more about it below.
Standard Implementation
Both Starting Points that ship with concrete5 5.5 use the standard Starting Point implementation, without ovrerriding any methods of the StartingPointPackage base class. This is what that StartingPointPackage does by default:
- First the installer creates all directories required by concrete5.
- Installs database.
- Adds the admin user.
- Adds the home page (which is just a placeholder at first.)
- Installs all attributes found in concrete/config/install/base/attributes.xml (CIF format.)
- Installs all block types found in concrete/config/install/base/blocktypes.xml (CIF format.)
- Installs themes found in concrete/config/install/base/themes.xml (CIF format.)
- Installs jobs found in concrete/config/install/base/jobs.xml (CIF format)
- Installs the Dashboard as found in concrete/config/install/base/dashboard.xml (CIF format.)
- Installs required single pages like login, register as found in concrete/config/install/base/login_registration.xml (CIF format.)
- Installs all config values in concrete/config/base/config.xml (CIF format.)
- Imports all files found in the Starting Point's files/ directory (if it exists.)
- Installs the content.xml file found in the Starting Point's directory.
- Sets site permissions to the default.
- Prefetches the home page and finishes installation.
You can see how this installation proceeds for yourself by looking in concrete/models/package/starting_point.php. Most Starting Point's won't need to deviate from this typical model – but if you do you can completely override certain aspects of the installation routines from within your StartingPointPackage class.
Content Import Format Files
Content Import Format (CIF) files are simply XML descriptions of concrete5 sites. This includes bits of functionality (block types, page types, task permissions, etc...) as well as descriptions of content, including pages, attributes, files, blocks and block content.
Example 1: Themes
By default, when concrete5 is installed, the themes.xml file is parsed in order to determine which themes should be installed.
<concrete5-cif version="1.0">
    <themes>
        <theme handle="default" package="" activated="1"/>
        <theme handle="greensalad" package="" activated="0"/>
        <theme handle="dark_chocolate" package="" activated="0"/>
    </themes>
</concrete5-cif>
When the "Sample Content With Blog" starting point is chosen, that package's handle is "standard", and the content.xml file found within the standard/ directory is parsed and installed. That content.xml file adds another theme (Greek Yogurt) to the installed site:
<themes>
    <theme handle="greek_yogurt" package="" activated="1"/>
</themes>
Note: this theme gets activated, superceding the "Plain Yogurt" default theme that had been activated before.
Example 2: Blank Starting Point
When choosing the "Blank" Starting Point, content.xml simply adds a Right Sidebar Page type, and the home page. This home page has no content on it, but it is an instance of Right Sidebar.
<concrete5-cif version="1.0">
    <pagetypes>
        <pagetype icon="right_sidebar.png" handle="right_sidebar" name="Right Sidebar" package="" />
    </pagetypes>
    <pages>
    <page name="Home" path="" filename="" pagetype="right_sidebar" description="" package="">
    </page>
    </pages>
</concrete5-cif>
Example 3: Basic Page with Content
This is a basic page with content in its areas:
<pages>
    <page name="Home" path="" filename="" pagetype="right_sidebar" description="" package="">
        <area name="Header">
            <block type="content" name="">
                <data table="btContentLocal">
                    <record>
                        <content><![CDATA[<h1>Welcome to concrete5
                        - an Open Source CMS</h1>]]></content>
                    </record>
                </data>
            </block>
        </area>
        <area name="Sidebar">
            <block type="content" name="">
                <data table="btContentLocal">
                    <record>
                        <content><![CDATA[<h3>Sidebar</h3>]]></content>
                    </record>
                </data>
            </block>
            <block type="content" name="">
                <data table="btContentLocal">
                    <record>
                        <content><![CDATA[<p>Everything about concrete5 is completely
                        customizable through the CMS.
                        This is a separate area from the main content on the homepage.
                        You can <a title="Move blocks in concrete5"
                        href="http://www.concrete5.org/documentation/general-topics/blocks-and-areas"
                        target="_blank">drag and drop blocks</a>
                         like this around your layout.</p>]]></content>
                    </record>
                </data>
            </block>
        </area>
        <area name="Main">
            <block type="content" name="">
                <data table="btContentLocal">
                    <record>
                        <content><![CDATA[<h2>Welcome to concrete5!</h2>
                            <p>Content Management is easy with concrete5's in-context editing.
                            Just <a href="http://legacy-documentation.concrete5.org/login">login</a> and you can
                            change things as you browse your site.</p>
                            ]]>
                        </content>
                    </record>
                </data>
            </block>
        </area>
        <area name="Header Image">
            <block type="image" name="">
                <data table="btContentImage">
                    <record>
                        <fID></fID>
                        <fOnstateID/>
                        <maxWidth><![CDATA[0]]></maxWidth>
                        <maxHeight><![CDATA[0]]></maxHeight>
                        <externalLink><![CDATA[]]></externalLink>
                        <internalLinkCID><![CDATA[0]]></internalLinkCID>
                        <altText><![CDATA[]]></altText>
                    </record>
                </data>
            </block>
        </area>
    </page>
</pages>
Placeholders
There are certain items in this last example that are contained within {} characters, and start with "ccm:export". These are import/export placeholders. Here is a list of them
Anywhere this is used, a link to a page will be returned, or an ID of a page will be returned if referenced in a block. Just make sure your page XML node has the matching path to the same page.
- **, **
Anywhere this is used, a link to a file or a file ID will be returned, if referenced in a block. Just make sure that the corresponding file exists within the files/ directory in your Starting Point.
Anywhere this is used, a reference to this page type ID will be used. Primarily used in blocks that need to reference page types.
Making Your Own Starting Points
In 5.5, it's easy to take a real, working concrete5 site and turn it into a Starting Point that can be reused and re-purposed.
Create a Folder for Your Starting Point
Place a folder in your local config/install/packages/ directory. A 97x97 icon.png file is optional.
Customize Your Site
Get your site looking the way you want it:
controller.php file
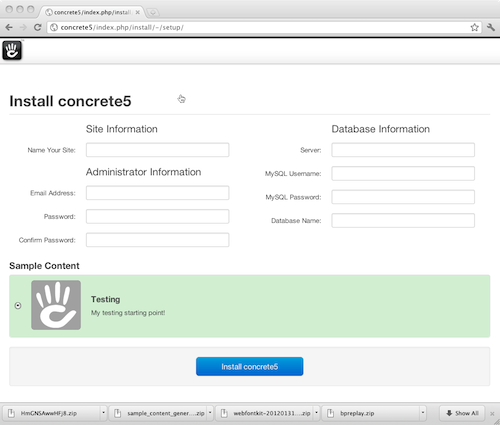
Your Starting Point's controller.php should go in this directory. It needs to follow standard package naming conventions. If we were creating a Starting Point named "Testing" here's how our controller.php might look:
<?php
class TestingStartingPointPackage extends StartingPointPackage {
    protected $pkgHandle = 'testing';
    public function getPackageName() {
        return t('Testing');
    }
    public function getPackageDescription() {
        return t('My testing starting point!');
    }
}
?>
Generating Starting Points
Once your site is ready, install the free Sample Content Generator add-on from the marketplace.
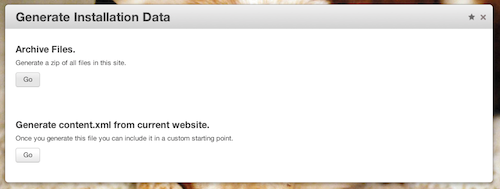
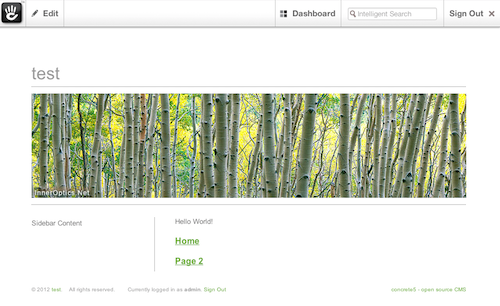
First, click the "Archive Files" button to generate an archive of files from your sample site. Save these files to a files/ directory in your testing/ directory.
Next, click the "Go" button beneath "Generate content.xml from current website." This creates an XML representation of your entire site. Since we're not really modifying much of the default behavior, we don't need to worry about grabbing most of these items. We just want to search for pagetype and pages. We'll cut everything out that we don't need, and end up with this, which is a description of the two pages in our website, including their blocks and page types.
<?xml version="1.0"?>
<concrete5-cif version="1.0">
    <pagetypes>
        <pagetype handle="full" name="Full" internal="0" icon="main.png" package="">
            <page name="" path="" filename=""
            pagetype="full" description="" package=""/>
        </pagetype>
        <pagetype handle="left_sidebar" name="Left Sidebar"
        internal="0" icon="template1.png" package="">
            <page name="" path="" filename=""
            pagetype="left_sidebar" description="" package=""/>
        </pagetype>
        <pagetype handle="right_sidebar" name="Right Sidebar"
        internal="0" icon="right_sidebar.png" package="">
            <page name="" path="" filename=""
            pagetype="right_sidebar" description="" package=""/>
        </pagetype>
    </pagetypes>
    <pages>
        <page name="Home" path="" filename=""
        pagetype="left_sidebar" description="" package="">
            <area name="Header Nav"/>
            <area name="Header">
                <block type="image" name="">
                    <data table="btContentImage">
                        <record>
                            <fID></fID>
                            <fOnstateID/>
                            <maxWidth><![CDATA[0]]></maxWidth>
                            <maxHeight><![CDATA[0]]></maxHeight>
                            <externalLink><![CDATA[]]></externalLink>
                            <internalLinkCID><![CDATA[0]]></internalLinkCID>
                            <altText><![CDATA[]]></altText>
                        </record>
                    </data>
                </block>
            </area>
            <area name="Sidebar">
                <block type="content" name="">
                    <data table="btContentLocal">
                        <record>
                            <content><![CDATA[<p>Sidebar Content</p>]]></content>
                        </record>
                    </data>
                </block>
            </area>
            <area name="Main">
                <block type="content" name="">
                    <data table="btContentLocal">
                        <record>
                            <content><![CDATA[<p>Hello World!</p>]]></content>
                        </record>
                    </data>
                </block>
                <block type="page_list" name="">
                    <data table="btPageList">
                        <record>
                            <num><![CDATA[0]]></num>
                            <orderBy><![CDATA[display_asc]]></orderBy>
                            <cParentID/>
                            <cThis><![CDATA[0]]></cThis>
                            <includeAllDescendents><![CDATA[0]]></includeAllDescendents>
                            <paginate><![CDATA[0]]></paginate>
                            <displayAliases><![CDATA[0]]></displayAliases>
                            <ctID/>
                            <rss><![CDATA[0]]></rss>
                            <rssTitle><![CDATA[]]></rssTitle>
                            <rssDescription><![CDATA[]]></rssDescription>
                            <truncateSummaries><![CDATA[0]]></truncateSummaries>
                            <displayFeaturedOnly><![CDATA[0]]></displayFeaturedOnly>
                            <truncateChars><![CDATA[0]]></truncateChars>
                        </record>
                    </data>
                </block>
            </area>
        </page>
        <page name="Page 2" path="/page-2" filename=""
        pagetype="left_sidebar" description="" package="">
            <area name="Header Nav"/>
            <area name="Header">
                <block type="image" name="">
                    <data table="btContentImage">
                        <record>
                            <fID></fID>
                            <fOnstateID/>
                            <maxWidth><![CDATA[0]]></maxWidth>
                            <maxHeight><![CDATA[0]]></maxHeight>
                            <externalLink><![CDATA[]]></externalLink>
                            <internalLinkCID><![CDATA[0]]></internalLinkCID>
                            <altText><![CDATA[]]></altText>
                        </record>
                    </data>
                </block>
            </area>
            <area name="Sidebar"/>
            <area name="Main">
                <block type="content" name="">
                    <data table="btContentLocal">
                        <record>
                            <content><![CDATA[<p>Hello World 2</p>]]></content>
                        </record>
                    </data>
                </block>
            </area>
    </page>
</pages>
</concrete5-cif>
We save this into content.xml in our Starting Point's directory.
Test Installation
Clear out your concrete5 installation and test with the new Starting Point:
Hooray! It worked!

Custom Config Values
Whenever a CIF file is imported, any nodes found within it can be added to your concrete5 site. Want to customize some of the Config values for your site when the Starting Point is installed? Just add the relevant customized Config values to the bottom of your content.xml:
<config>
    <WHITE_LABEL_LOGO_SRC>http://www.mysite.com/logo.jpg</WHITE_LABEL_LOGO_SRC>
    <WHITE_LABEL_APP_NAME>Cement6</WHITE_LABEL_APP_NAME>
</config>
Customizing your StartingPointPackage class.
We built this website using the default StartingPointPackage configuration. But you can feel free to modify the constructor in your extended StartingPointPackage class to include different routines, functions and approaches.
Using CIF With Add-Ons & Themes
While CIF files are definitely suited for use when installing concrete5, you can use them to install content when installing an add-on. From within your add-on's install() method, just add
Loader::library('content/importer');
$ci = new ContentImporter();
$ci->importContentFile($this->getPackagePath() . '/content.xml');
Full Content Swap
Another new feature that's especially useful is this class variable for packages:
protected $pkgAllowsFullContentSwap = true;
Add this to your package, and super users will be asked, prior to installing your theme, whether it is ok for the theme to completely wipe all contents of the site, setting up its own content. This can be especially useful for complex themes that ship with blocks, custom templates, and optimal configurations.
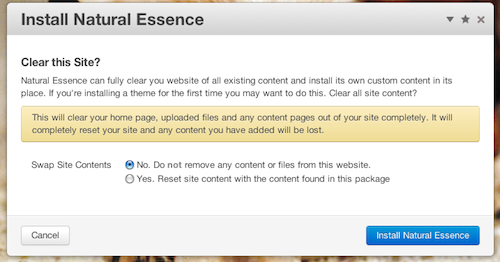
If the user commits to the full content swap, all user-facing content will be removed from the site, any files found in the theme package's content_files/ directory will be imported, and content.xml will be located within the package's directory, parsed and installed.
Conclusion
concrete5 5.5 offers much greater flexibility and power around custom installation content, white labelling, installation and theme content. Expect Starting Points and custom content to be available soon, just as add-ons and themes are currently found in the marketplace.