By Andrew Embler, CTO of concrete5. Also available at andrewembler.com
The content block was the first concrete block ever created – but immediately after that came the Auto-Nav, which persists to this day. It makes sense: beyond getting text out there, the web's foremost purpose is linking one page to another, and that's what the Auto-Nav is for. In this primer I'm going to tell you what the Auto-Nav does and what its options mean. Then I'll explore some practical examples, how you can control the way it displays and links pages, and how to theme and extend it.
Version History of this How-To
- 1.1 - Fixed the $bt->render() to $bt->render('view')
- 1.0 - Initial version
What Does It Do?
The Auto-Nav block is designed to create lists of pages on your site. Based on your criteria, it determines where to pull pages from, how many pages to pull, and in what order to place them. Its stock templates display these pages in a simple unordered HTML list.
Understanding Auto-Nav's Options
The Auto-Nav block exposes the following options:
Pages Should Appear
This option determines the ordering of pages in the Auto-Nav block. The following options are available:
- In their sitemap order / In reverse sitemap order
This lists all pages in every level of the resulting tree in the same order (or reverse order) that they are listed in the Dashboard sitemap. This is the most flexible option, as site administrators may reorder pages in the sitemap, and have those changes immediately take effect in all Auto-Nav blocks that are ordered by this option. - With the most recent first
This option lists pages in descending order, with the page that has the greatest public date first. (Note: Public date is the date that the user may change in the Page Properties pane. It is *not* the date that the page was originally added.) - With the earliest first
Like the previous option, except pages are displayed in ascending order, starting with the earliest public date. - In alphabetical order / In reverse alphabetical order
Pages are displayed alphabetically (or in reverse alphabetical order) by page name.
Display pages to users even when those users cannot access those pages
By default, the Auto-Nav block hides any reference to pages that the current site visitor cannot access. This means that a page accessible only to registered users will not appear in an Auto-Nav block for users who are not logged in. This setting will override that behavior.
Display Pages
This option determines the first level at which the Auto-Nav begins showing pages.
- Top
The Auto-Nav will begin at the top level of the website. These are the pages directly added beneath the home page (which will automatically be prepended to the results.) - Second Level / Third Level
The Auto-Nav will begin at the second or third level of the website. (Note: This only produces results when the page to which the Auto-Nav block is added is at or below the specified level. ) - Above
The Auto-Nav will begin at the level above the current page. - Current
The Auto-Nav will begin at the level of the current page. - Below
The Auto-Nav will begin at the level below the current page. - Beneath a particular page
A sitemap selector widget will allow the administrator to determine where this particular Auto-Nav block starts.
Sub Pages to Display
This option controls which sub-pages of the current level will be shown.
- None
Pages at the current level (selected in the "Display Pages" section) will be shown, but no sub-pages beneath any of those pages will be displayed. - Relevant sub-pages
Any pages that lead to the current page will be shown, but no others will be. *Note*: This option is only valid and useful when beginning the Auto-Nav at a level greater than the current page. - Display breadcrumb trail
Only the direct parents of pages that lead to the current page will be shown. (Note: This option is only valid and useful when beginning the Auto-Nav at a level greater than the current page.) - Display all
All sub-pages for all pages shown in the nav will be shown. (Note: The pages will still only be shown for as long as the "Sub-Page Levels" option (see next) is valid – so make sure that property is set correctly.)
Sub-Page Levels
For Auto-Nav instances that display sub-pages, this parameter controls how many levels of sub-pages are shown.
- Display sub pages to current
Displays as many sub-pages as it takes to get to the current page. - Display sub pages to current + 1
Displays as many sub-pages as it takes to get to the current page, and then displays the next level of sub-pages beneath the current page. - Display all
Displays all sub pages for as long as "Sub Pages to Display" is valid. - Display a custom amount
Allows the administrator to set a custom level of sub-pages to display.
Auto-Nav's HTML Markup
The markup created by the regular Auto-Nav is simply an unordered HTML list.
<ul class="nav">
   <li class="nav-path-selected"><a class="nav-path-selected" href="/">Home</a></li>
   <li><a href="/index.php/about/">About</a>
   <ul>
      <li><a href="/index.php/about/press-room/">Press Room</a>
      <ul>
         <li><a href="/index.php/about/press-room/re/">April 1st, 2010 - 5:27 PM</a></li>
         <li><a href="/index.php/about/press-room/white/">April 8th, 2010 - 12:38 PM</a></li>
      </ul>
      </li>
      <li><a href="/index.php/about/guestbook/">Guestbook</a></li>
      <li><a href="/index.php/about/cool-page/">Cool Page</a></li>
   </ul>
   </li>
   <li><a href="/index.php/search/">Search</a></li>
   <li><a href="/index.php/awesome-test/">Awesome Test</a></li>
   <li class="nav-selected nav-path-selected">
      <a class="nav-selected nav-path-selected" href="/index.php/sitemap/">Sitemap</a>
   </li>
</ul>
A few classes of note:
- ul.nav
The outer UL tag gets the "nav" class in the stock Auto-Nav template. - ul.nav-header
The outer UL tag in the "Header Menu" custom template. - li.nav-path-selected, a.nav-path-selected
These classes apply to any nodes that contain the current page, from the top on down. - li.nav-selected, a.nav-selected
These classes apply to the LI and A tags for the currently active page.
Practical Examples
Here are some common use cases for the Auto-Nav block.
Header Menu
The goal - to list all pages at the top level of a website, in sitemap order, toward the top of a page.
Here is the current setup of the example site in question:

That means we'll want our navigation to list About, Search and Awesome Test, in our Header Nav area. To do this, setup the Auto-Nav block in this way:

That creates the proper menu, but it is styled incorrectly (since our styles are setup to use the "nav-header" unordered list class, and the Auto-Nav typically outputs a list with the class "nav."

Fortunately, the Header Nav custom Auto-Nav template is setup to output a list with the proper classes, so we change the custom template:

And we get nice results:

Sidebar Sectional Navigation
If we have an "About" page at the top level of our site, and a large amount of content beneath it, it makes sense that we might want to list all pages within the About section on pages beneath it. This is what I refer to as Sectional Navigation. Within this section, we want to show all pages and sub-pages to whatever current page we're on.
Here is an example of some sectional navigation on concrete5.org:
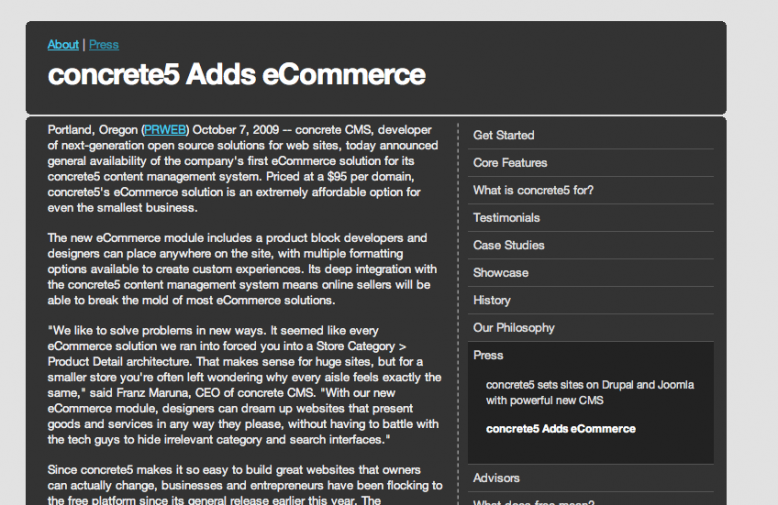
This is a screenshot taken within our About section. Check out the right sidebar. Here we display all sub-pages of our current section (About), all the way on down to whatever current page we happen to be viewing ("concrete5 Adds eCommerce.") Here's how we accomplish that:

Breadcrumb
That same page also contains a breadcrumb navigation element, which the Auto-Nav takes care of. We've wanted to setup the breadcrumb so that it displays parent pages down to the current page, but not the current page itself.

For that, we start the pages at the top level, display only breadcrumb sub-pages, and display sub-pages to the current page.

There is a problem, however: that option would *also* display the current page, which is something we don't want to do. Additionally, it would display the items in an unordered list, which – unless we have special styling setup – doesn't look good with a breadcrumb.
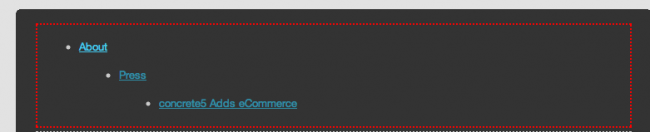
The key, then, is to use the included "Breadcrumb" custom template. This will do two things:
- Ensure that the current page is *not* displayed in the navigation.
- Print out pages in a row, with pipe signs between them:


Full Sitemap
The Auto-Nav block is frequently used to print out the sitemap for an entire site.

Just display pages at the top level, and all sub-pages/sub-page levels beneath:

Alphabetical Reference
The following example will show one level of sub-pages directly beneath the current page, sorted alphabetically.

The result:

News Archive
Let's say we want to show all pages beneath the Press Room section of our website, sorted with the most recent first.

The Result:

Since this block is pulling pages beneath a particular sub-page, it can be added to any area of the site.
Page Attributes
There are two page attributes which affect the behavior of the Auto-Nav. In general, these are all boolean/checkbox types, and are applied directly to the pages you wish to affect (whether from the page in question, or from the Dashboard Sitemap)
- Handle: exclude_nav
When applied to a page, this page will not appear in the Auto-Nav block view template. It will still be passed to the template, but it will be skipped over. - Handle: replace_link_with_first_in_nav
When created and applied to a page, if this page is ever encountered in an Auto-Nav view template, the link to the page will be replaced with a link to the first child of the page in question. This is useful for creating pages where you wish to link into a section of a site, instead of being forced to create landing pages for your content.
Auto-Nav's Block Item Class
At its core, the Auto-Nav block retrieves an array of concrete5 Page objects and makes them available to various templates to display. Each page object is wrapped in the Auto-Nav's custom AutonavBlockItem class, which adds a few extra methods, including the retrieval of which level the current navigation item exists, and the number of pages beneath it. These methods are
- AutonavBlockItem::getName()
Returns the name of the page. - AutonavBlockItem::getDescription()
Returns the page's short description. - AutonavBlockItem::getURL()
Returns the URL of the page. - AutonavBlockItem::getLevel()
Gets the current level of the navigation item within the nav itself. - AutonavBlockItem::hasChildren()
Returns true if the navigation item has children within this navigation (note: currently this will return true even if the item does not display children since they have their exclude_from_nav flags set (see below.))
(Note: Some of these methods did not work properly prior to concrete 5.4.0.6.)
The array of these AutonavBlockItem objects is made available through $controller->generateNav() in the Auto-Nav view template.
Embedding the Auto-Nav Directly into Templates
As with most other concrete5 blocks, the Auto-Nav can be embedded directly into your theme's templates. This can be useful when you'd like to force a header nav or a sidebar nav into your site without having to worry about adding it to every page. Before we switched to using the Superfish Menu, here's how we embedded the header into concrete5.org
$bt = BlockType::getByHandle('autonav');
$bt->controller->displayPages = 'top';
$bt->controller->orderBy = 'display_asc';
$bt->render('templates/header_menu');
And here's another example, embedding the breadcrumb menu:
$bt = BlockType::getByHandle('autonav');
$bt->controller->displayPages = 'top_level';
$bt->controller->orderBy = 'display_asc';
$bt->controller->displaySubPages = 'relevant_breadcrumb';
$bt->controller->displaySubPageLevels = 'enough';
$bt->render('templates/breadcrumb');
To use the stock view (rather than a custom template), just call render() with 'view' as the one argument:
$bt->render('view'); Further Experimentation
For those who want to experiment further with the Auto-Nav, I recommend doing the following.
- Create this file in your local blocks directory
blocks/autonav/templates/testing.php - Open concrete/blocks/autonav/view.php and copy its contents into the file above.
- Add a new Auto-Nav block somewhere on your site, and apply the "Testing" custom template to it.
- Hack away at testing.php and at the Auto-Nav block options for as long as you'd like!
Seriously, that's probably the best advice I can give: this how-to should give you some background on the purpose and functionality of the Auto-Nav, but real experimentation is probably the only way you're going to get comfortable with it. But while it may take a little while to become familiar with, it will undoubtedly prove useful (after all, it's been there since the very beginning.)