Documentation
Permissions
Front End Fileset Tools enables selected users to manage a fileset with no further permissions settings to configure. The user(s) enabled to manage a fileset can be selected from:
- The owner of the page
- A single user
- A group of users
- Any registered user
Users that don't have access simply don't get to see the block. If you also have Magic Data, you can use a Magic Data expression to determine who has access.

Configuring the on-page listing and editing
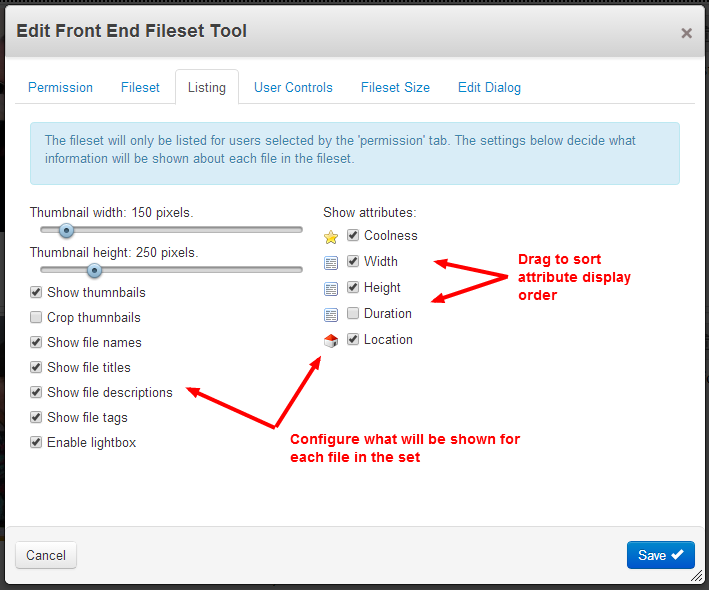
Once a user and a fileset have been selected, the appearance of how that fielset is shown to the user can be fully configured from the edit dialog.
- Appearance, size and cropping of thumbnails
- Which properties are shown
- Which attributes are shown and the sequence they are shown in
- Which properties may be edited
- Which attributes may be edited
- Whether the fileset may be sorted
- Whether files may be deleted or removed from the set
- Whether deletion or removal requires a confirmation dialog
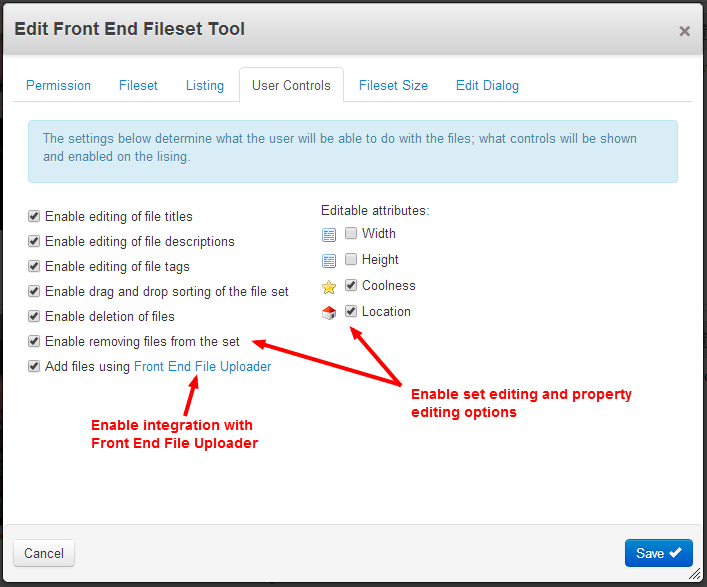
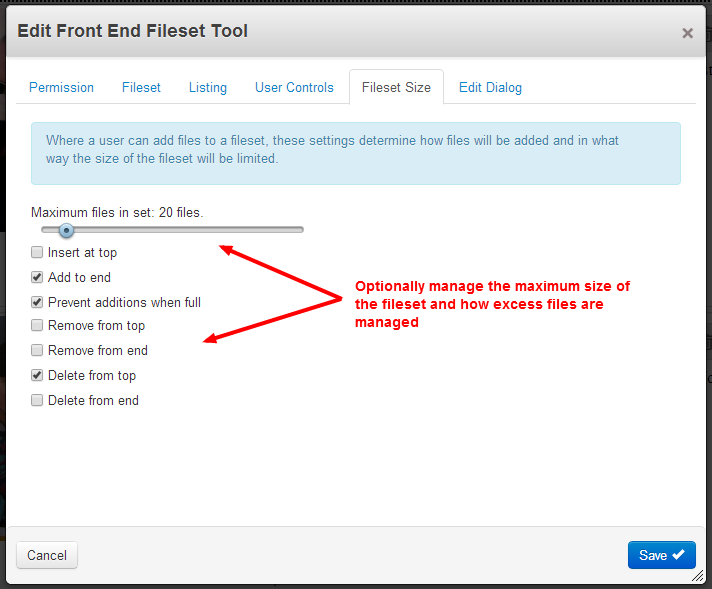
Uploading files to the set from the front end is provided through integration with Front End File Upoloader (purchased separately). The upoloading functionality is entirely optional and Front End Fileset Tools will provide all othger functionality without the uploader. Integration with Front End File Upoloader requires further options to be set:
- Whether new uploaded files are inserted at the top or end of the set
- Optionally limit the size of the set
When that limit is reached:
- Whether further uploads are blocked
- Whether excess files are deleted from the set or merely removed
- Whether removal/deletion is from the top or end of the set
 .
.
Edit dialog
The edit dialog shown to edit file properties or attributes can be configured to use jQuery.ui, as per concrete5 core dialogs, or Fancybox.
In both cases, form element styling can be selected to follow concrete5 dashboard styling as per ccm.app.css or to be unstyled.
For safety and security the default setting is that html tags should be stripped from all edited properties and attributes.

Integration with Front End File Uploader
Fo integrated uploading, a Front End File Uploader block should be placed on the same page as a Front End Fileset Tools block and both configured for the same user and fileset.
Front End File Uploader should be set to not refresh the page when closed.
Front End Fileset Tools will monitor Front End File Uploader for upload and completion events. To limit fileset size, checking "Prevent additions when full" in Front End Fileset Tools will cause Front End Fileset Tools to force Front End File Uploader to close when the fileset size is reached and hide its icon. The icon will be shown again should files be removed or deleted from the set.
Front End Fileset Tools can also be set to remove or delete excess files from the fileset.
On the Front End File Uploader Processing tab, make sure Reload after Upload is not checked as reloading the page may prevent Front End Fileset Tools from processing the fileset after upoload.
Magic Data Integration
If you also have Magic Data, you can use Magic Data expressions to specify the fileset and who has access.
Access decision
The entered Magic Data expression must return true or any other non false value for front end access to be enabled.
A false, zero or null value will prohibit front end access.
Fileset
The entered Magic Data expression must return fileset ID.
The above few words provide an unbelievable expansion of uses for multi-user-multi-fileset sites such as social sites, busiuness directories and photoghraphy competitions. You could place FEFT and FEFU on a profile page so each user can manage their own image stes or other file sets. Add Black Magic Data and the combined blocks can even create new filesets as users are added to the site.
Advice on use
Front End Fileset Tools will list a complete fileset without any pagination. Site owners should consequently use discretion with the length of filesets this block is used with.
Lightbox preview
The thumbnail/preview lightbox overlay makes no distinction about file types. The file is simply given to Fancybox and Fancybox left to get on with it. This is fine for image files, but could have unusual results if you enable the lightbox for filesets containing files such as MSWord documents.
If you want to apply Front End Fileset Tools to a single file, you can place it in a fileset by itself.
Multiple blocks
While multiple Front End Fileset Tools blocks can be placed on the same page, doing so is not recommended. In particular, should the filesets or files shown in Front End Fileset Tools bocks overlap, no attempt is made to synchronise between blocks. So changes made in one block will not be instantly reflected in another block. Resulting changes made to the managed filesets and files may consequently be difficult to comprehend.
Fancybox dialogs
The version of Fancybox used is 1.3.4 because that version is MIT licenced. This has been adjusted to:
- Help defend against collision with other addons using fancybox. See: Protect a jQuery plugin from colliding with files from other add-on packages.
- Work with the latest versions of jQuery. See https://github.com/prdolmos/fancybox-1.3.4-patched-for-jquery-1.9
A possible consequence is that other blocks that use Fancybox on the same page may either obstruct this block with a different version of Fancybox or vice-versa. If such an issue occurs, the use of Fancybox by Front End Fileset Tools may be disabled in the edit dialog. If you want to continue using Fancybox for lightbox or dialogs, you may need to override block controllers to agree on the version loaded.
Additional Assets
The assets needed for the editable attributes should be loaded automatically. However, attributes can be strange things and there is no standardised method of loading some obscure attribute assets. Is such cases you may need to manually select for specific object/attribute assets to be loaded using the assets tab of the edit dialog.
Attribute Limitations
Another consequence of the perversity of some complex marketplace attributes is that they may not be editable through Front End Fileset Tools. If in doubt, please ask before purchasing.
Theming and templates
The HTML structure of Front End Fileset Tools is complex and generated through a view, a library and a series of elements. However, all items are marked with css classes that can be used to manipulate the layout of items within the block.
For most theming requirements I recommend simply copying the view.php to a new template and the appearance can be substantially changed using the associated view.css. Unlike many other blocks, the view.css is explicitly loaded from a parallel structure beneath the package css directory.
Each template within the block's /templates directory has a corresponding css file in the package's css/feft/ directory.
To create a new template, place the template view.php in siteroot/blocks/jl_front_end_fileset_tools/templates/templatename/view.php and place the corresponding view.css in siteroot/css/feft/templatename/view.css.
The name of a template will be automatically inserted as a class in the outermost wrapping element of the block and dialogs, so can be easily used to scope and differentiate block themes.
To change the icons used in the toolbars you will need to override the respective toolbar elements.
The color and opacity of the Fancybox lightbox modal overlay may be adjusted using the site constants:
- FEFT_LIGHTBOX_OVERLAY_COLOR
- FEFT_LIGHTBOX_OVERLAY_OPACITY
Alternatively, the overlay color and opacity may be hard coded into a view template.
Where a template sets list item width and floats to provide a multiple column layout, you may also want to allow the drag-drop sorting to move in a direction other than just the y-axis. This can be set through a site constant:
- FEFT_SORTABLE_AXIS
Allowed values are x,y and empty string for both x and y.
When additional notifications are enabled, the default time the notification is shown is 3000ms. This may be adjusted by the site constant:
- FEFT_NOTIFICATION_HUD_TIME_MS
Advanced configuration and concrete5 version compatibility
Attribute compatibility
For concrete5 versions before 5.6.3.1, select attributes may not save or validate.
For concrete5 versions 5.6.3.1 +, all core attributes can be edited and saved for files.
For attribute types other than core attributes, compatibility is not guaranteed, but may be possible either by default or by adjusting site configuration constants as below.
Saving attributes
Inside Front End Fileset Tools, attributes are saved by one of two methods:
- Using File's setAttribute() method
- Through simulating the request post values passed to an attribute's saveForm() method
From concrete5.6.3.1 onward, method (1) is used by default for all attribute types. Before concrete5.6.3.1, method 2 is used by default.
To change this behaviour, the constant FRONT_END_ATTRIBUTE_SIMULATE_FORM_FOR_TYPES can be set as a comma separated list of attribute type handles or attribute handles, an empty string or as 'ALL_ATTRIBUTE_TYPES'.
Validation
The conatsnt FRONT_END_ATTRIBUTE_SKIP_VALIDATIOIN_FOR_TYPES can have similar values to FRONT_END_ATTRIBUTE_SIMULATE_FORM_FOR_TYPES and is used to skip the attribute types' built in validation method when saving. By default this is set for 'boolean' attributes. If you have issues with specific attribute types or attributes, you can list them with this constant and the attribute's validateForm method will not be called.
Flattening Multi Dimensional Arrays
The conatsnt FRONT_END_ATTRIBUTE_FLATTEN_DATA_FOR_TYPES defaults to just 'select'. When enabled for an attribute, the form data is flattened to a plain list and any select option ids are converted to their respective values.
The only use I can forsee for this option other than the default is for third party attribute types that extend the select attribute type. However, it may also be relevant to other third party attribute types.